.png)
Traditional Orthodox Iconography: The Egg Tempera Process
Creating an authentic Byzantine icon is a journey of patience, prayer, and precision. We do not use shortcuts. Every piece in our studio follows the ancient canon, layer by layer, taking weeks to complete. Here is the step-by-step process of bringing sacred art to life.

1.رسم الرؤية
تبدأ العملية برسم دقيق بقلم الرصاص على الورق، لتحديد الأبعاد الهندسية واللاهوتية للمشهد قبل نقله إلى الخشب.

3. تجهيز الأساس (الچالاك)
نضع طبقة الـ "چالاك" (الأساس) على المناطق التي سيتم تذهيبها. تتطلب هذه الطبقة المهمة فترة جفاف صارمة تبلغ 3 أيام لضمان ثبات الذهب بشكل مثالي.

5. الطبقات ا�لتأسيسية
يتم وضع طبقتين تأسيسيتين من الألوان فوق المناطق المرسومة، مما يثبت الرسم ويمهد الطريق للعمل الدقيق القادم.

7. البروبلاسموس للملابس (اللون الأساسي)
نضع الـ "بروبلاسموس" (اللون الأساسي الداكن) للملابس. في الفن البيزنطي، نبدأ دائماً من الظلمة لننتقل نحو النور.

9. البروبلاسموس للجسد والوجه
يُطبق اللون الأساسي على اليدين والوجه وأي أجزاء مكشوفة، ليكون الأساس للتعبير الروحي للقديس.

11. كتابة الاسم وإنهاء الإطار
تُكتب تسمية القديس بالطريقة التقليدية لتعريف الأيقونة رسمياً، وتُنقح الحدود والتفاصيل النهائية للإطار.
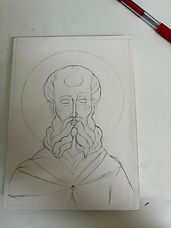
2. النقل إلى اللوح
يُنقل الرسم بعناية إلى لوح خشبي مُجهز خصيصاً، مع تحديد الخطوط الأساسية للأيقونة.

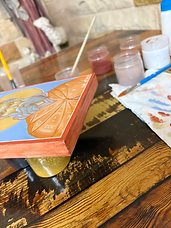
4. التذهيب
يُوضع ورق الذهب الحقيقي بعناية فائقة على أساس الچالاك، ليرمز إلى النور الإلهي غير المخلوق.

6. الخلفية والهالة
تلوين الخلفية وتحديد الهالة (رمز القداسة) حول رأس القديس.

8. إبراز نور الملابس (3 درجات)
تُضاف ثلاث طبقات متدرجة من الإضاءة إلى الملابس، مما يمنحها بعداً وحركة وحياة.

10. إضاءة الوجه واليدين
من خلال ثلاث درجات دقيقة من الإضاءة، يُرسم الوجه واليدان انطلاقاً من الأساس الداكن. هذه هي الخطوة الأهم، حيث تتجلى روح الأيقونة.
12. الجفاف والورنيش النهائي
يجب أن ترتاح الأيقونة المكتملة وتجف لمدة لا تقل عن أسبوعين. بعدها فقط، يُطبق طلاء الورنيش الواقي لحفظ الألوان لأجيال قادمة.
1. Drafting the Vision
The process begins with a precise pencil sketch on paper, establishing the geometry and theology of the scene before it touches the wood.
3. The Chalak Base (3 Days Curing)
We apply the "Chalak" (bole base) to the areas that will be gilded. This crucial layer requires a strict 3-day drying period to ensure the gold adheres flawlessly.
5. The Underpainting
Two foundational layers of color are applied over the sketched areas. This seals the drawing and sets the tone for the intricate work ahead.
7. Proplasmos of the Garments Garments
We lay down the Proplasmos (the dark base color) for the garments. In Byzantine art, we always paint from darkness into light.
9. Proplasmos of the Flesh
The base color is applied to the hands, face, and any exposed skin, acting as the foundation for the spiritual expression of the saint.
11. Inscribing the Name & Framing
The saint's name is traditionally inscribed, officially identifying the icon. The borders and final framing details are polished.
2. Transferring to the Board
The drawing is carefully transferred onto a specially prepared wooden board, carving the foundational lines of the icon.
4. 23K Gold Gilding
Genuine gold leaf is painstakingly applied to the chalak base, symbolizing the uncreated divine light of heaven.
6. Background and Halo
The background colors are filled in, and the halo the symbol of sanctity is refined and outlined around the saint's head.
8. Illuminating the Garments (3 Levels)
Three distinct layers of highlights are added to the garments, building dimension and bringing movement and life to the fabric.
10.Illuminating the Face and Hands
Through three delicate levels of lighting, the face and hands are sculpted out of the dark base. This is the most crucial step, revealing the soul of the icon.
12. Curing and Varnishing
The completed icon must rest and cure for a minimum of two weeks. Only then is the protective varnish applied, sealing the colors for generations to come.